Decorative Fondant Flower Techniques
Highlighted under: Worldly Dishes
I love diving into the world of cake decorating, and one of my favorite techniques is working with fondant to create decorative flowers. The artistry involved allows me to express my creativity while adding an elegant touch to my baked goods. Each flower tells a story, and mastering these techniques has not only improved my skills but has also brought an incredible sense of satisfaction. So, let's explore the beauty of fondant flowers together and elevate your cake decorating game!
When I first began working with fondant, I was both excited and intimidated. However, after several attempts, I discovered the key to achieving beautiful, life-like flowers lies in the right tools and techniques. I recommend investing in good-quality fondant, as it makes a significant difference in texture and pliability. Additionally, keep your workspace clean and organized, so you can focus on creating rather than searching for tools.
One of my favorite tips is to always use a small amount of cornstarch to prevent sticking while rolling out fondant. This simple step greatly enhances my workflow and ensures that my flowers maintain their shape during the creation process. Trust me, once you get the hang of these techniques, you’ll feel as though you can bring a bit of nature into every cake!
Why You Will Love This Recipe
- Transform your cakes with stunning hand-crafted flowers
- Perfect for special occasions or as a delightful hobby
- A satisfying way to express creativity through baking
The Importance of Fondant Quality
Using high-quality fondant can drastically affect the appearance and flavor of your decorative flowers. I recommend working with fondant that has a smooth, pliable texture, as this will allow for easier shaping and a more aesthetically pleasing finish. If you choose homemade fondant, ensure that it's well-kneaded and free from cracks. Store-bought fondant offers convenience, but opt for brands that have a good reputation for taste and texture for the best results.
Texture is crucial when it comes to fondant flowers. The fondant should be slightly tacky to the touch but not sticky, which can hinder your ability to work with it. If your fondant feels too dry, you can add a tiny bit of vegetable shortening to restore elasticity. Conversely, if it’s too sticky, a dusting of cornstarch will help. Finding the right balance can enhance your crafting experience and lead to more realistic flowers.
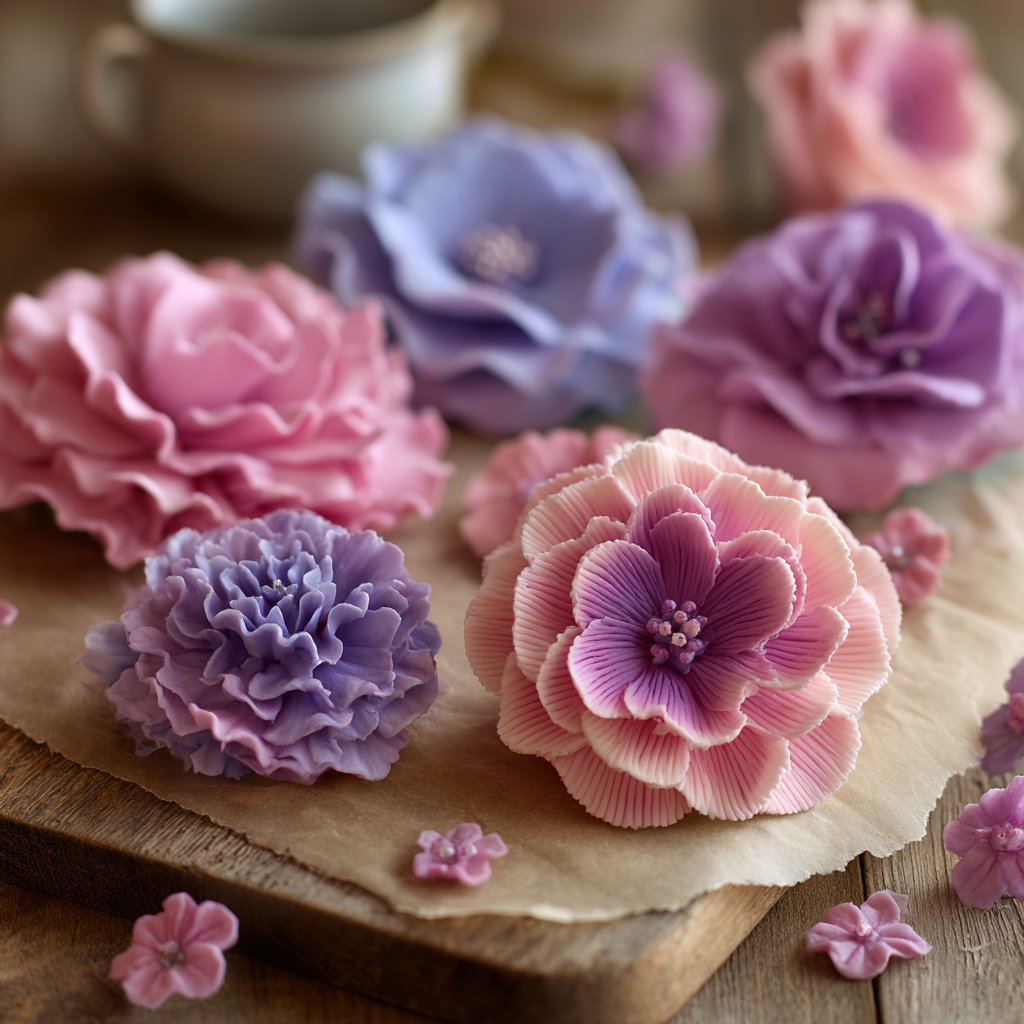
Mastering Petal Techniques
The way you shape your petals will dramatically impact the final look of your flowers. When cutting petal shapes from rolled fondant, aim for varying sizes to create depth and realism. Use a ball tool not just to curve the edges but also to lift the petals slightly off your work surface, which helps them maintain a natural, lively shape. This subtle technique enhances the flower's three-dimensional effect, making them more visually striking.
Another technique to consider is the use of veining tools to add details that mimic the texture of real flower petals. After cutting your petals, lightly press the veining tool into the surface for authentic detailing. I suggest practicing on scraps of fondant first to get a feel for pressure. The goal is to create delicate lines without compromising the integrity of your petal shape—aim for subtle rather than overdone.
Ingredients for Fondant Flowers
Basic Fondant Ingredients
- 1 lb of fondant (store-bought or homemade)
- Cornstarch (for dusting)
- Food coloring (optional, for adding color)
- Gum paste (for added durability if desired)
- Edible glitter (optional, for decoration)
Additional Tools Needed
Steps to Create Decorative Fondant Flowers
Preparing Your Workspace
Begin by clearing your workspace and gathering all your materials. Dust your countertop with cornstarch to prevent sticking, and ensure you have your fondant, tools, and colorants ready.
Coloring the Fondant
If you’d like to add color to your flowers, knead in the desired food coloring until evenly distributed. A little goes a long way, so start small!
Shaping the Petals
Roll out a small piece of colored fondant into a thin sheet. Use petal cutters or your knife to cut out petal shapes. Gently shape the edges with a ball tool for a realistic look.
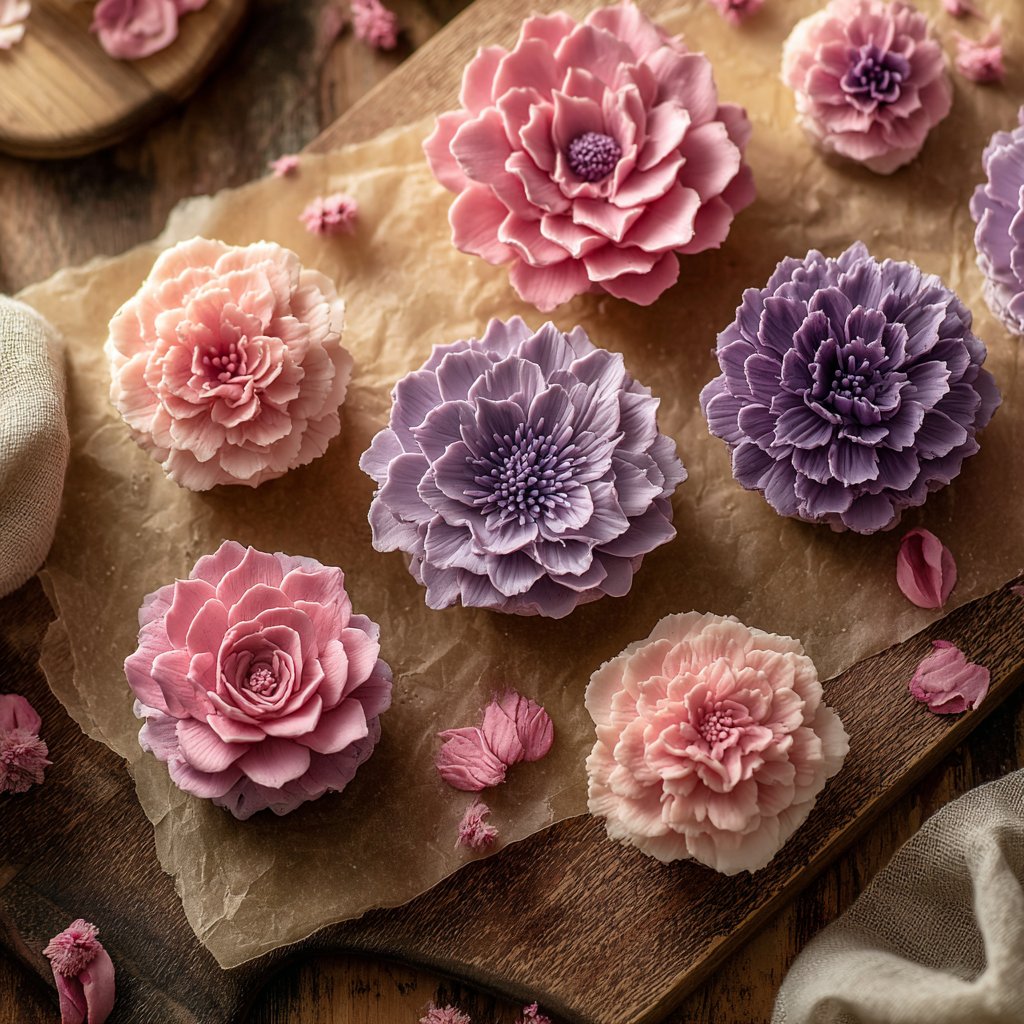
Assembling the Flower
Once you have multiple petals ready, start assembling your flower by layering the petals systematically. Use water or edible glue to help them adhere together. For the center, roll a small ball of the same or contrasting color.
Adding Finishing Touches
You can add textures using veining tools or soft brushes dipped in color. Enhance the flower further by adding edible glitter or dust for a sparkle effect.
Final Presentation
Pro Tips
- Practice makes perfect! Don’t hesitate to experiment with different shapes and sizes to find your unique style. Remember to keep the fondant covered when not in use to prevent it from drying out.
Storage and Make-Ahead Tips
If you're planning to create fondant flowers ahead of your event, it’s possible to make them 2-3 days in advance. Store your finished flowers in an airtight container at room temperature; exposure to humidity can cause them to become sticky. A sprinkle of cornstarch on the base can help prevent sticking and maintain shape. If you need more time, consider placing them in the refrigerator for a longer shelf life, but make sure they are well-protected from moisture.
When it comes to transporting your fondant flowers, consider using a sturdy box or cupcake carrier to keep them safe from damage. Place a non-stick mat or paper between layers if you need to stack them. A simple tip is to chill the flowers in the fridge for about 20 minutes prior to transport; this helps them firm up slightly, reducing the risk of breakage.
Troubleshooting Common Issues
One common issue while working with fondant flowers is cracking, especially in the petals. If you notice cracks forming, it can often be attributed to overly dry fondant. To fix this, knead in a small amount of vegetable shortening until the texture is smooth again. Additionally, when rolling out fondant, ensure that you maintain an even thickness to avoid any uneven areas that might be prone to cracking.
If your flowers aren't sticking together during assembly, it might be a sign that they’re too dry or that you're not using enough adhesive. A quick fix is to brush the inner surfaces of the petals with a tiny amount of water or edible glue. This helps them bond securely. Just be cautious—using too much moisture can lead to sagging petals, so a delicate touch is key.
Questions About Recipes
→ Can I use homemade fondant?
Absolutely! Homemade fondant can be just as effective, and you can customize the flavors to suit your preferences.
→ Do I need special tools for making flowers?
While some specialty tools can help, many basic tools like a rolling pin and a knife can work just fine for beginners.
→ How do I store my fondant flowers?
Store fondant flowers in a cool, dry place and avoid direct sunlight. You can keep them in an airtight container for best results.
→ Can I make these flowers in advance?
Yes, you can! Fondant flowers can be made ahead of time and stored properly, allowing you to save time when decorating your cake.
Decorative Fondant Flower Techniques
Created by: The Chefconnorfoods Team
Recipe Type: Worldly Dishes
Skill Level: Intermediate
Final Quantity: 12 flowers
What You'll Need
Basic Fondant Ingredients
- 1 lb of fondant (store-bought or homemade)
- Cornstarch (for dusting)
- Food coloring (optional, for adding color)
- Gum paste (for added durability if desired)
- Edible glitter (optional, for decoration)
How-To Steps
Begin by clearing your workspace and gathering all your materials. Dust your countertop with cornstarch to prevent sticking, and ensure you have your fondant, tools, and colorants ready.
If you’d like to add color to your flowers, knead in the desired food coloring until evenly distributed. A little goes a long way, so start small!
Roll out a small piece of colored fondant into a thin sheet. Use petal cutters or your knife to cut out petal shapes. Gently shape the edges with a ball tool for a realistic look.
Once you have multiple petals ready, start assembling your flower by layering the petals systematically. Use water or edible glue to help them adhere together. For the center, roll a small ball of the same or contrasting color.
You can add textures using veining tools or soft brushes dipped in color. Enhance the flower further by adding edible glitter or dust for a sparkle effect.
Extra Tips
- Practice makes perfect! Don’t hesitate to experiment with different shapes and sizes to find your unique style. Remember to keep the fondant covered when not in use to prevent it from drying out.
Nutritional Breakdown (Per Serving)
- Calories: 120 kcal
- Total Fat: 3g
- Saturated Fat: 1g
- Cholesterol: 0mg
- Sodium: 5mg
- Total Carbohydrates: 25g
- Dietary Fiber: 0g
- Sugars: 20g
- Protein: 1g